| Lookup Relationship | Master Detail Relation ship |
| Loosely coupled | Tightly coupled |
| Max number of lookup is 25 | Max number of master is 2 |
| Parent is not a mandatory field | Parent is a mandatory field |
| Partent delete child cannot delete | parent delete child also delete |
| Roll up cannot be made on lookup | Roll up can be made on master-detail |
| You can have a detail record without a lookup reference | You cannot have a detail record without a master |
| You can set profile object permissions for a child record | You cannot set profile object permissions for a child record |
Tuesday, 28 June 2016
Difference between Lookup Relationship and Master-Detail RelationShip in salesforce.
Friday, 10 June 2016
Apex trigger in salesforce
Trigger is piece of code that is executes before and after a record is Inserted / Updated / Deleted from the force.com database.
A trigger is Apex code that executes before or after the following types of actions:
There are two types of triggers:
Before creating triggers, consider the following:
By default every apex trigger is a bulk trigger which is used to process the multiple records at same time as a batch. For each batch of 200 records.
When to use Triggers:
Let me give you the definitive answer to perhaps the most commonly asked Apex question:
“Should I use a before or after trigger?”
 Trigger Context Variables:
All triggers define implicit variables that allow developers to access run-time context. These variables are contained in the System.Trigger class.
All the trigger context variables are prefixed with “Trigger.” (Ex: Trigger.isInsert, etc..)
isInsert: Returns true if the trigger was fired due to insert operation.
isUpdate: Returns true if the trigger was fired due to update operation.
isDelete: Returns true if the trigger was fired due to delete operation.
isBefore: Returns true if the trigger was fired before record is saved.
isAfter: Returns true if the trigger was fired after record is saved.
New: Returns a list of new version of sObject records.
Old: Returns a list of old version of sObject records.
NewMap: Returns a map of new version of sObject records. (map is stored in the form of map<id,newRecords>)
OldMap: Returns a map of old version of sObject records. (map is stored in the form of map<id,oldRecords>)
Size: Returns a integer (total number of records invoked due to trigger invocation for the both old and new)
isExecuting: Returns true if the current apex code is a trigger.
The below table is tells what are the events we can use in the new trigger and old trigger
Trigger Context Variable considerations:
Tags:
Apex trigger, soql trigger, salesforce trigger
A trigger is Apex code that executes before or after the following types of actions:
- Insert
- Update
- Delete
- Merge
- Upsert
- Undelete
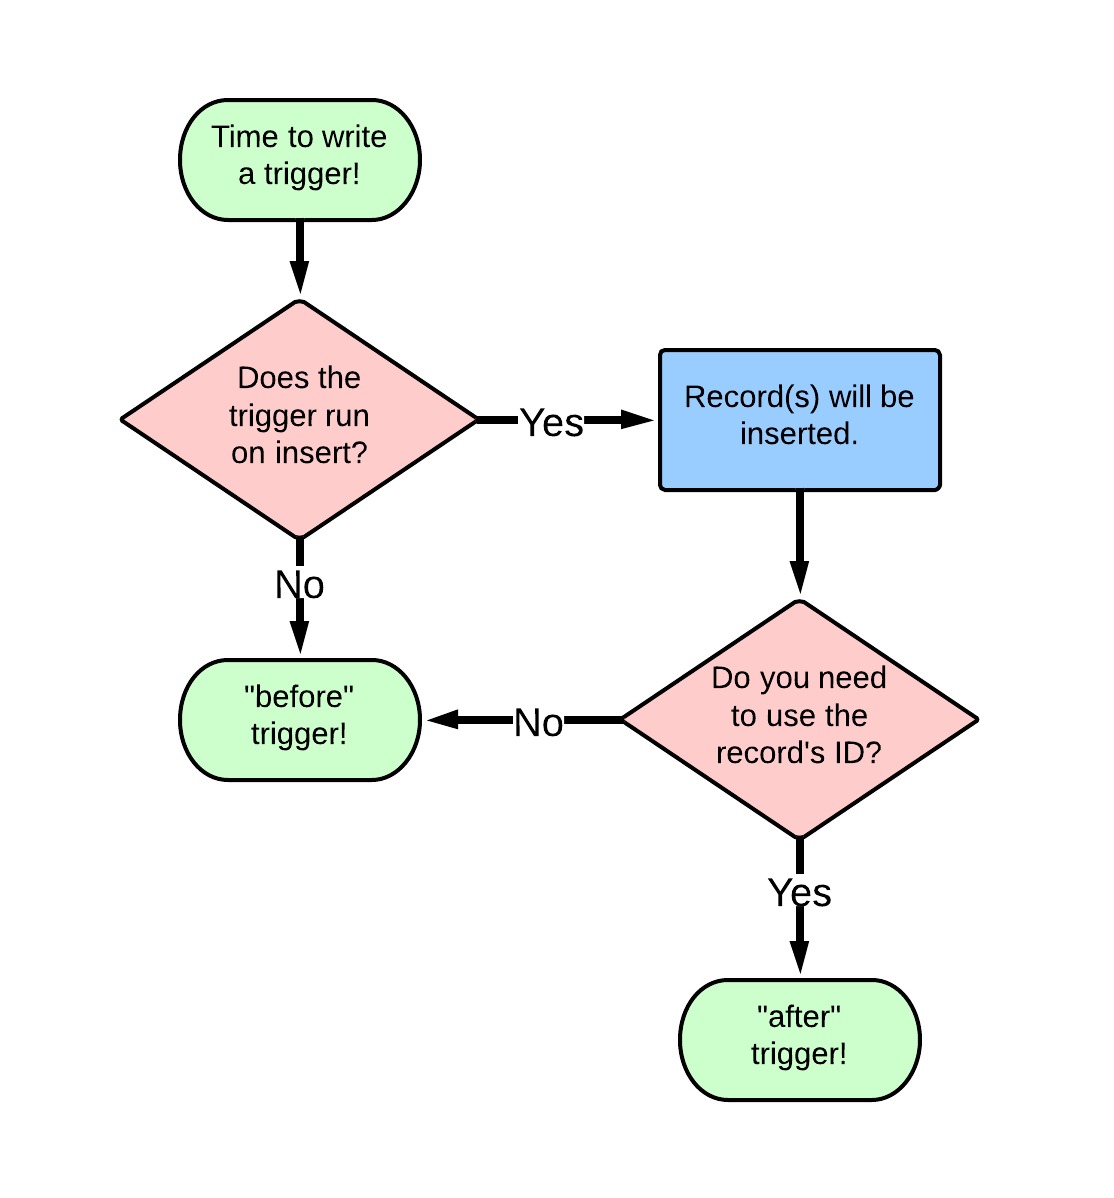
There are two types of triggers:
- Before triggers: used to update / validate record's before they are saved to the objects.
- After triggers: used to access fields values that are set by the system (i.e. a record's Id), and to affect changes in other record's, such as logging into an audit table or firing asynchronous events with a queue. The record's that fire the after trigger are read-only.
Before creating triggers, consider the following:
- upsert triggers fire both before and after insert or before and after update triggers as appropriate.
- merge triggers fire both before and after delete triggers for the losing records and before update triggers for the winning record only. See Triggers and Merge Statements.
- Triggers that execute after a record has been undeleted only work with specific objects. See Triggers and Recovered Records.
- Field history is not recorded until the end of a trigger. If you query field history in a trigger, you don’t see any history for the current transaction.
- Field history tracking honors the permissions of the current user. If the current user doesn't have permission to directly edit an object or field, but they activate a trigger that changes an object or field with history tracking enabled, no history of the change is recorded.
- In API version 20.0 and earlier, if a Bulk API request causes a trigger to fire, each chunk of 200 records for the trigger to process is split into chunks of 100 records. In Salesforce API version 21.0 and later, no further splits of API chunks occur. If a Bulk API request causes a trigger to fire multiple times for chunks of 200 records, governor limits are reset between these trigger invocations for the same HTTP request.
By default every apex trigger is a bulk trigger which is used to process the multiple records at same time as a batch. For each batch of 200 records.
When to use Triggers:
Let me give you the definitive answer to perhaps the most commonly asked Apex question:
“Should I use a before or after trigger?”
All triggers define implicit variables that allow developers to access run-time context. These variables are contained in the System.Trigger class.
All the trigger context variables are prefixed with “Trigger.” (Ex: Trigger.isInsert, etc..)
isInsert: Returns true if the trigger was fired due to insert operation.
isUpdate: Returns true if the trigger was fired due to update operation.
isDelete: Returns true if the trigger was fired due to delete operation.
isBefore: Returns true if the trigger was fired before record is saved.
isAfter: Returns true if the trigger was fired after record is saved.
New: Returns a list of new version of sObject records.
Old: Returns a list of old version of sObject records.
NewMap: Returns a map of new version of sObject records. (map is stored in the form of map<id,newRecords>)
OldMap: Returns a map of old version of sObject records. (map is stored in the form of map<id,oldRecords>)
Size: Returns a integer (total number of records invoked due to trigger invocation for the both old and new)
isExecuting: Returns true if the current apex code is a trigger.
The below table is tells what are the events we can use in the new trigger and old trigger
| Trigger Event | Trigger.New | Trigger.Old |
| Before Insert | Yes | No |
| Before Update | Yes | Yes |
| Before Delete | No | Yes |
| Before UnDelete | No | Yes |
| After Insert | Yes | No |
| After Update | Yes | Yes |
| After Delete | No | Yes |
Trigger Context Variable considerations:
- Trigger.Old is always readOnly
- We cannot delete trigger.new
- In before triggers, trigger.new can be used to update the fields on the same object.
- In After trigger, we get run time exception is thrown when user try to modify the fields in the same object.
Tags:
Apex trigger, soql trigger, salesforce trigger
Tuesday, 7 June 2016
Difference between trigger and workflow
| Workflow | Trigger |
| Workflow is automated process that fired an action based on Evaluation criteria and rule criteria. | Trigger is a piece of code that executes before or after a record is inserted or updated. |
| We can access a workflow across the object. | We can access the trigger across the object and related to that objects |
| We cannot perform DML operation on workflow | We can use 20 DML operations in one trigger. |
| We cannot query from database | We can use 20 SOQL’s from data base in one trigger. |
| workflows will only helpful to update the same object or master object in custom master-detail relationships. | Trigger can work across objects and also you can query or DMLs operation. |
| Workflow is inbuilt functionality and used on single objects or master-detail | Trigger is used for complex business process where multiple Object's need to be handle. |
| Workflow can work only after some action. | Trigger can be used before and after some action. |
What are the main things need to consider in the “Master-Detail Relationship”?
Point to remembeir when creating “Master-Detail Relationship”
Parent child relationship is tightly coupled relationship having some below attributes

Parent child relationship is tightly coupled relationship having some below attributes
- Parent reference become mandatory for child object.
- Standard objects can't become child of any object.
- Master details support Cascaded delete: if you delete the parent, it can cascade delete the child.
- Sharing rules on child object's determind by parent.
- You can have only 2 master details relationship on an object in salesforce.

Self Relationship
Self Relationship is a
lookup relationship to the same object. Suppose let’s take an object
“Merchandise”. Here we can create relationship in between the Account to
Account (same object) object. That is called “Self Relationship”.

List examples of custom field types?
Text, Pick list, Pick list
(multi select), Date, Email, Date/Time, Date, Currency, Checkbox,
Number, Percent, Phone, URL, Text Area, Geolocation, lookup
relationship, master detail relationship etc…..
A custom object contains some records, now my requirement is to create field in this object with master detail relationship. Can we create master detail relationship in this case?
No, directly we cannot create master details relationship if custom object contains existing records.
Following are the steps to create to create master-detail relationship when records are available in custom object.
- First create field with lookup relationship.
- And then associate look field with parent record for every record
- Next change the data type of the field from look up to Master detail.
create Many – to – Many relationship?
Lookup and Master detail
relationships are one to many relationships. We can create many – to –
Many relationship by using junction object. Junction object is a custom
object with two master detail relationships.


What is “Master-Detail Relationship”?
Master Detail relationship is
the Parent child relationship. In which Master represents Parent and
detail represents Child. If Parent is deleted then Child also gets
deleted. Rollup summary fields can only be created on Master records which will calculate the SUM, AVG, MIN of the Child records.
Up to 2 allowed to object.
Parent field on child is required.
Access to parent determines access to children.
Deleting parent automatically deletes child.
A child of one master detail relationship cannot be the parent of another.
Lookup field on page layout is required.


What is a “Lookup Relationship”?
This type of relationship links two objects together,
Up to 25 allowed for object
Parent is not a required field.
No impact on a security and access.
No impact on deletion.
Can be multiple layers deep.
Lookup field is not required.


What is object in Sales force?
Custom
objects are database tables that allow you to store data specific to
your organization in salesforce.com. You can use custom objects to
extend salesforce.com functionality or to build new application
functionality.
Once
you have created a custom object, you can create a custom tab, custom
related lists, reports, and dashboards for users to interact with the
custom object data. You can also access custom object data through the
Force.com API.
Navigation to create object in sales force: Setup->Build->Create->Object-> Click on new object and create object according to your requirement.
Step by Step of How to Add Fields in Salesforce
Step One
This is how to add fields in Salesforce.
Go to the management setting of the object that you want to add to your
Salesforce field, click the fields after which you will find a custom
task and the event fields, go to the object management setting then
click new, you can also go to the custom object and create a field
dependencies and history tracking fields in this section which will help
and guide you on how to send mass email in Salesforce.
Step Two
How to Add Fields in Salesforce
Ensure that you choose the right kind of field that you want before clicking the next button but consider the following.
You must ensure that all the parameters
and the governing rules are all enforced, this drives and shows all the
user how to interact and respond to all the corresponding fields.
Salesforce provides you with numerous types of fields that you can
choose from. The types that are available when you create your custom
field are only but the subsets of the main field.
Remember that some data types are always
available in certain configuration. The custom setting and the external
objects will only allow the subsets of data types that are available in
the system. You cannot add any kind of multi- select picklist,
dependent picklist or rich text area. The summary roll up option only
exists on certain objects. Bear in mind that if you uses the shield
platform encryption you must be able to operate and understand how you
can encrypt the custom field using your organizational shield platform
encryption by following the details you will be able to know how to create a report in Salesforce and how to add fields in Salesforce.
Step Three
Ensure that you configure the attributes of the field
Remember that all the fields that you
have created have attributes that defines them. The attributes can be
names, length or even color text, but some attributes may provide
numerous meanings and that will giving an opportunity to use them in
different scenarios. Ensure that you are well familiar with all the
attributes before you create your Salesforce field.
Attributes that a field must have.
– The Field Label- this is the name that is displayed to the user.
– Field Name- this
name that differentiate you from other users, ensure that your field
name contain only the alphanumeric characters and the underscores, it
must begin with letters and end with a number or letter and show you how
to create email template in Salesforce.
– Description- this
text is available merely for references purpose, it is used to
elaborate and explain the purpose of the field that you have created.
You should also ensure that you populate your description even though
the reason for adding a field is obvious this will show you how to
create email template in Salesforce and how to schedule a report in Salesforce.
Step Four
This is the most important detail that
you should take care of, ensure that you have establish a permission
entrance to your new field. After setting your field type and setting
the attributes you have to set a visibility of and also access to the
fields across. There are options that you can choose from when creating
security protocol for your account, you can either use the Table B1-1
this is a matrix which can either a read only columns visible which you
can edit with the assistance of CRUD which means create, read, update
and delete this gives you all the information on how to create email template in Salesforce.
If you are looking for tips on how to
add fields in Salesforce and strengthen your returns on investment then
this article gives you all the information that you need to know about
create an amazing workforce and add field and how to schedule a report
in Salesforce.
Saturday, 4 June 2016
What is TAB in Salesforce?
Tab is a user interface component to user creates to display custom object data.
There are three type of tabs.
1) Custom object tabs
Custom object tabs are the user interface for custom applications that you build in salesforce.com.
They look and behave like standard salesforce.com tabs such as accounts, contacts, and opportunities
2) Visualforce Tabs
Visualforce Tabs are custom tabs that display a Visualforce page. Visualforce tabs look and behave like standard salesforce.com tabs such as accounts, contacts, and opportunities.
3) Web Tabs
Web Tabs are custom tabs that display web content or applications embedded in the salesforce.com window. Web tabs make it easier for your users to quickly access content and applications they frequently use without leaving the salesforce.com application.
4) Lightning Component Tabs
Lightning Component tabs allow you to add Lightning Components to the navigation menu in Salesforce1.
5) Lightning Page Tabs
Lightning Page Tabs let you add Lightning Pages to the Salesforce1 navigation menu.
Lightning Page tabs don't work like other custom tabs. Once created, they don't show up on the All Tabs page when you click the Plus icon that appears to the right of your current tabs. Lightning Page tabs also don't show up in the Available Tabs list when you customize the tabs for your apps.
You can't access the Lightning Component tab outside of Salesforce1. For example, you can't access the Lightning Component tab from the full Salesforce site.
Note:- To create Tab, User Permissions Needed
Define a Custom object tabs to display data stored in your custom object records.
1) From Setup, enter Tabs in the Quick Find box, then select Tabs or Setup - Build - Create and click on Tabs.
2) Click New in the Custom Object Tabs related list.
3) Select the custom object to display in the custom tab. The label of the new tab is the same as the plural version of the custom object label.

4) Click the Tab Style lookup icon to display the Tab Style Selector.
5) Click a tab style to select the color scheme and icon for the custom tab.
6) Optionally, choose a custom link to use as the introductory splash page when users initially click the tab.
7) Enter a description of the tab, if desired, and click Next.
8) Choose the user profiles for which the new custom tab will be available.

9) Specify the custom apps that should include the new tab.

10) Select "Append tab to users' existing personal customizations" checkbox to add the tab to your users’ customized display settings if they have customized their personal display.
11) Click Save.

What is Cloud Computing?
- Pictorial representation of internet is Cloud.
- Cloud Computing is nothing but internet computing.
- With this approach everything can be done in internet, no need of any minimum hardware requirements and no need to install any software in local system.
- Cloud Computing is an approach to provide the following services:-
- SAAS (Software As A Service)
- PAAS (Platform As A Service)
- IAAS (Infrastructure As A Service)

Subscribe to:
Posts (Atom)